
welcome to:
simple field
production
techniques
This free online workshop is designed for all AOC members seeking to learn effective techniques for capturing high-quality audio and video in the field. This introductory workshop covers the main features and functions of AOC’s basic field gear and best practices for prepping a video shoot.
Type of Instruction: Self-paced
Average time to complete: 1 hour

The process of capturing audio or video in the field requires a unique understanding of your surrounding environment. Natural settings are not quite as controlled as an in-house studio. Therefore, prior preparation for a variety of conditions and challenges is the key to capturing exceptional field audio and video for interviews, documentaries, short films, and the like.
In this workshop, you will learn:
How to properly setup and store AOC’s basic field gear
How to reserve use of AOC’s field gear through our online reservation system (Rueshare)
How to configure internal and external camera settings for shooting
How to submit content for air on AOC
I. Safety
and Safe
Operation:
What to Know BEFORE Getting Started
To ensure the safety of yourself and AOC’s gear, please review our brief safety video and adhere to all safety measures when handling production equipment.
II. Intro to
field gear:
View each video below to get acquainted with AOC’s orange kit for simple field production:
What’s included in the Orange Kit?
Here’s a quick time-lapse walkthrough of the Orange Kit’s contents, which include:
A video recording camera [Canon XA-10]
Battery charging accessories
File transfer accessories
Audio mic for sound capture
Tripod for camera stability
A CLOSER LOOK AT Your Camera
Next, let’s discover the basic functions and features of the Canon XA-10 video camera supplied in AOC’s Orange Kit.
Tech tools & terms to know:

SD Card
A memory or storage card used to record your audio and video files.

Microphone
An instrument for converting sound waves into electrical energy variations, which may then be amplified, transmitted, or recorded.

Power Supply (AC Converter)
An adapter that can plug into an outlet and supply the camera with power.

XLR Cable
This connection looks like a small circle with three pins or three holes which form a sort of smile; sometimes called a “mic” cable because it is the standard connection for microphones.

Headphone Jack
Jargon for the place where you would plug a cable connector. "Ex: Plug your headphones into the 1/8” jack.”

XLR to 1/8” Adapter
A cable with an 1/8” male (headphone) connection on one end an XLR (female) connection on the other.
III. Preparing
for your
shoot:
SteP 1: Reserve your equipment
AOC’s Facility Members and All-Access Members can reserve AOC’s field gear for their productions through the Rueshare reservation system. Learn how to successfully request equipment with our step-by-step tutorial. Please note:
Reservations must be submitted no later than 16 business hours (or 2 business days) before the date and time you request. For example, if you would like to pick up a camera on Tuesday, 4/17/2025 at 10:00am, you would need to submit your reservation no later than Friday, 4/14/2025 at 10:00am.
After you submit your request, you will receive an email confirmation for your reservation. If you don’t receive a confirmation email, send us an email info@aocinc.org or call us (337)232-4434 to confirm the status of your reservation before pickup.
If you know what equipment you will need for your production, you may request it now with the button below or request it later from the “Make Media” tab on our Homepage.
SteP 2: Prepare your gear
Now it’s time to prep your Recording Media and your Equipment.
Your Recording Media is the device or location where you will record and store your footage, like a memory card. Here are the SD card status and recommendation for AOC’s Orange Kit (Canon XA-10) Camera Kit. (Please note that AOC does NOT provide SD cards for the following gear).

These cameras have internal storage and can record at least 5 hours of footage using only the internal storage, but you will need to transfer your footage to an external storage device before you return the camera. You are welcome and encouraged to use your own SD cards to record and store footage.

Where do I insert my SD Card?
1. Make sure your video camera is powered off.
2. Flip open the camera screen to reveal the settings panel, and open the double memory card slot cover.
3. Insert your memory card straight, with the label facing the front of the camcorder, all the way into one of the slots until it clicks. (You can use two memory cards if desired, one in each slot).
4.Close the double memory card slot.

Where do I attach my battery or power supply?
To connect battery: Locate the battery slot on the rear of the camera. Press the battery pack softly into the battery attachment unit (small black arrow facing up) until it clicks into place.
To connect power supply: Connect the power cord to the compact power adapter and plug into a wall power outlet or power strip. Then connect, your power adapter cable into the camera’s DC IN terminal.

How do I connect my external microphone?
1. Connect the provided XLR cable to the desired input channel of the camera handle. When using only one audio input, use the CH1 input.
2. Connect the opposite end of the XLR cable into your audio recording device (i.e. microphone).
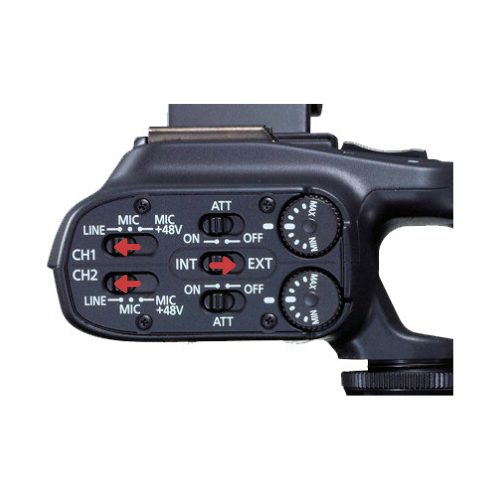
3. Locate the audio settings on the other side of the input handle. Set the audio input switch to EXT.
4. Set the XLR terminal switch of the desired channel to LINE or MIC.
(If you need to supply your mic with phantom power, set the mic to MIC +48V instead. Make sure to connect the mic FIRST, before turning the phantom power on. Keep the microphone connected when turning off the phantom power.)
Step 3: prepare your internal camera settings
Follow along with these short tutorials to locate and adjust your settings for shooting video:
BASIC SETTINGS:
How to Set Your Recording Quality
How to Set Your Media Destination
How to Format Your SD Card
INTERMEDIATE
SETTINGS:
Optional: These short tutorials cover how to locate and adjust settings for intermediate-level camera functions. You may follow along with these tutorials to adjust settings like focal ratio, shutter speed, and white balance.
step 4: record your media

Now we’re ready to shoot!
1. Press the [START/STOP] button on the rear of the camera OR on top of the camera handle to begin recording. A red dot will appear on the screen throughout the duration of your recording.
2. To adjust your camera’s zoom range, use the ZOOM lever (located atop the camera beside the [START/STOP] button. Press the front lever lightly to tighten [T] or zoom in on your subject. Press the back lever lightly to widen [W] or zoom out away from your subject.
3. To pause the recording, press [START/STOP] button again.
When monitoring your recording, be aware of the following factors and correct as necessary:

Exposure
Is your image too dark/too bright? Use the Exposure options available in the [FUNC] > [Rec. Program] menu to correct the image.

White Balance
Is the color wrong? Use the White Balance options available in the [FUNC] > [WB White Balance] menu to correct the image.

Focus
Is the image blurry? If so:
1. Touch the [FUNC] button.
2. Open the focus controls: [FUNC]. (Be sure your camera mode switch is set to Manual mode or Cinema mode).
3. Touch [MF] button.
4. Touch a subject that appears inside the Focus frame. The focusing distance will be adjusted automatically. You have the option to further adjust the focus manually as necessary.
IV. After
recording

Always pack all of the gear in the provided cases when traveling between locations or returning gear to AOC.
If you recorded on the internal memory of the camera, be sure to use the provided USB cable to transfer your footage by importing it using an editing program such as Final Cut Pro X (installed on AOC’s Post Lab computers).
If you used your own SD cards, be sure to remove them from the camera.
WE STRONGLY RECOMMEND THAT YOU USE THE LOCK FEATURE ON THE SD CARD TO SAVE YOUR FOOTAGE UNTIL YOU CAN IMPORT IT.
DO NOT USE THE SD CARD FOR ANY OTHER PURPOSE UNTIL YOU HAVE TRANSFERRED THE FOOTAGE.
V. submit
your content!
Did you know AOC can help you distribute your content to more viewers?
Let us help you get your voice and your vision shared! AOC will broadcast ANY locally-produced content, submitted by members OR non-members, FOR FREE on your our TV channels (LUS 3&4 and COX 15&16) and our YouTube page: AOC Community Media.
Once your footage is ready to air, submit it to us with the button below (You can also find this button through the Make Media > Submit Programming tab on our Homepage). AOC depends on you to share your content with us so we can demonstrate and highlight the support our organization is providing to the Acadiana community.
(***Remember: Your content belongs to you! You maintain 100% ownership rights to all content you produce. AOC simply serves as the distribution hub by which your voice is amplified.***)
still Got simple field production Questions?
AOC members (individuals and organizational groups) can request FREE 30-minute virtual tutoring sessions to assist with your production gear or software questions. Request a virtual one-on-one or small group tutoring session with a Production Assistant with the button below: